MySQL

Turn on the General Log on a MySQL Container on Demand

I use the following snippet to turn on the MySQL general_log inside my development MySQL containers to peek what is going on: ./mysql-general-log.sh container

#!/bin/bash

# Usage: ./mysql-general-log.sh [container_name]
# This script sets MySQL general logging in a specified Docker container, tails the log, 
# and then disables general logging.

# Default container name if not provided as an argument
CONTAINER=mysql-container

# If a container name is provided as an argument, use that instead
if [ ! -z "$1" ]; then
    CONTAINER=$1
fi

docker exec -it $CONTAINER sh -c 'mysql -uroot -h 127.0.0.1 -e "SET GLOBAL general_log_file=\"/tmp/mysql-genneral.log\";" -e "SET GLOBAL general_log=1"'
docker exec -it $CONTAINER sh -c 'tail -f /tmp/mysql-genneral.log'
docker exec -it $CONTAINER sh -c 'mysql -uroot  -h 127.0.0.1 -e "SET GLOBAL general_log=0"'

MySQL Shell complains about Unknown Option

The MySQL Shell program complained about an unknown option, even when none were provided when I started it.

$ mysqlsh
While processing defaults options:
mysqlsh: unknown option --default-character-set

In order to fix this, I simply added the wrongly interpreted option to my defaults file

[mysql]
reconnect=false
character-set-server=utf8

[mysqldump]
column-statistics=0

and started the util with the flag for reading a config file like this mysqlsh --defaults-file=~/.my.cnf root@127.0.0.1:3306

Difference between KILL QUERY and KILL CONNECTION in MySQL

Recently we discussed the difference between the MySQL commands KILL QUERY and KILL CONNECTION at work.

The MySQL documentation states the following:

KILL permits an optional CONNECTION or QUERY modifier:

KILL CONNECTION is the same as KILL with no modifier: It terminates the connection associated with the given processlist_id, after terminating any statement the connection is executing.

KILL QUERY terminates the statement the connection is currently executing, but leaves the connection itself intact.

In order to test the behavior manually, you can use two different MySQL connections by starting the client twice. I had to disable the automatic reconnection which is enabled by the MySQL client per default. To do so, I simply had to add the following to ~/.my.cnf:

[mysql]
reconnect=false

A small test programm

In order to play around with both commands, I needed SQL statements which take a little while, in order to have enough time to kill them. While SLEEP() comes to mind, it is not ideal because MySQL detects that sleeping does not change any data. The following Python program stores large blobs in the MySQL database. While it is not recommended to store binary data in MySQL because it is slow, it is a good use case for demoing some behavior of the database. The snipped creates random binary files of 100 MB in a loop and stores them in a table. It also stores the SHA256 hash of each file, so that we can later ensure that the file has actually been written into the database entirely. After all, we want to ensure that either way of killing a query does ensure that the transaction itself is atomic, meaning that it either goes through entirely, ro gets rolled back.

The important part is that we wrap the entire loop into a transaction.

import hashlib
import os
import time

import mysql.connector

# Replace these with your own database credentials
db_config = {
    'host': '127.0.0.1',
    'port': '3306',
    'user': 'root',
    'database': 'MeasurementDB',
}

try:
    # Connect to the MySQL database
    conn = mysql.connector.connect(**db_config)
    cursor = conn.cursor(dictionary=True)

    # Create a table for measurement data
    create_table_query = """
    CREATE TABLE IF NOT EXISTS DataBlobs (
    id INT AUTO_INCREMENT PRIMARY KEY,
    file_name VARCHAR(255) NOT NULL,
    file_data LONGBLOB NOT NULL,
    file_size INT NOT NULL,
    file_type VARCHAR(100) NOT NULL,
    file_hash char(64) NOT NULL
    );
    """
    cursor.execute(create_table_query)
    cursor.execute("TRUNCATE TABLE DataBlobs")

    # Start a transaction
    conn.start_transaction()

    try:
        for x in range(0,10):
            # Define the file size in bytes
            file_size = 100 * 1024 * 1024

            # Generate a random binary file
            random_data = os.urandom(file_size)

            # Specify the file name
            file_name = "random_file.bin"

            # Write the random data to the file
            with open(file_name, "wb") as file:
                file.write(random_data)

            file = open(file_name,mode='rb').read()

            # Compute SHA256 hash
            file_hash = hashlib.sha256(file).hexdigest();

            cursor.execute("SELECT CONNECTION_ID() AS conn_id")
            query_result = cursor.fetchone()
            print("Current Connection ID: {}".format(query_result['conn_id']))

            insert_query = "INSERT INTO DataBlobs (file_name, file_data, file_size, file_type, file_hash) VALUES (%s, %s, %s, %s, %s)"
            tic = time.time()
            cursor.execute(insert_query, ('random_file-{}.bin'.format(x), random_data, len(random_data), 'application/octet-stream', file_hash))
            toc = time.time()
            print("-- Insert file {} successfully ({} seconds).".format('random_file-{}.bin'.format(x), str(round((toc - tic),2))))

            tic = time.time()
            cursor.execute("SELECT file_name, IF((sha2(file_data,256)=file_hash),'equal', 'not equal') AS equal FROM MeasurementDB.DataBlobs ORDER BY id DESC LIMIT 1;")
            toc = time.time()

            query_result = cursor.fetchone()
            print("-- Hash of file {} is {} ({} seconds).".format(query_result['file_name'], query_result['equal'], str(round((toc - tic),2))))


        conn.commit()
    except mysql.connector.Error as err:
        conn.rollback()  # Rollback the transaction if there's an error
        print(f"Error: {err}")
    finally:
        cursor.close()
        conn.close()

except mysql.connector.Error as err:
    print(f"Connection error: {err}")
finally:
    conn.close()

Results and Screencasts

Below are the three results I tested.

Run through without killing anything

The following screencast shows the MySQL Workbench and the Python script in the command line. In this example, the script just runs through without interruptions and commits the entire transaction at the end with a COMMIT. Then you can see that the data is stored in the table and also our script reports identical hashes.

Long running queries go through uninterrupted

Long running queries go through uninterrupted

This is the standard case. But what happens if we must abort the query?

Killing the entire connection

The second example shows how we kill the entire connection by using the button in MySQL Workbench. In AWS RDS you would need tob use the CALL mysql.rds_kill stored procedure provided by AWS, see the docs.

Killing the connection

Killing the connection

The entire execution is aborted immediately, the data is rolled back. The MeasurementDB.DataBlobs table remains empty.

Killing only the statement

The third example is interesting, because it seems to depend at which state of the execution of a statement the KILL QUERY arrives. Instead of killing the entire transaction immediately, it depends if MySQL decides that it rather finishes the current statement. It might require multiple attempts to actually abort the execution.

Killing only the query

Killing only the query

Also in this case the transaction is rolled back and no data is permanently stored within the table.

Rename foreign keys in MySQL

Foreign keys are essential for maintaining the referential integrity in relational databases. Sometimes, their names change, for example when you use Percona’s pt-online-schema-change and suddenly all your foreign keys have an underscore prefix.

MySQL does not provide an option to rename foreign keys on the fly. Typically the foreign key needs to be dropped and re-created. Adding a foreign key can be expensive when the index on the column does not already exist. In the case of renaming a foreign key, the index on the key column does exist already, thus renaming an foreign key is a lot cheaper.

The text snippets below are from the the documentation.

MySQL supports to ADD and DROP a foreign key within one ALTER TABLE statement. This only works when you use the ALGORITHM=INPLACE option.

Adding and dropping a foreign key in the same ALTER TABLE statement is supported for ALTER TABLE ... ALGORITHM=INPLACE but not for ALTER TABLE ... ALGORITHM=COPY.

INPLACE makes the ALTER statements much faster, but there are additional constraints.

INPLACE: Operations avoid copying table data but may rebuild the table in place. An exclusive metadata lock on the table may be taken briefly during preparation and execution phases of the operation. Typically, concurrent DML is supported.

That is important because

ALTER TABLE operations that use the COPY algorithm wait for other operations that are modifying the table to complete. After alterations are applied to the table copy, data is copied over, the original table is deleted, and the table copy is renamed to the name of the original table. While the ALTER TABLE operation executes, the original table is readable by other sessions (with the exception noted shortly). Updates and writes to the table started after the ALTER TABLE operation begins are stalled until the new table is ready, then are automatically redirected to the new table. The temporary copy of the table is created in the database directory of the original table unless it is a RENAME TO operation that moves the table to a database that resides in a different directory.

The problem is that ALGORITHM=INPLACE only works when the foreign_key_checks are disabled. Only then we can we can use a non-locking online DDL change. The key to this is using LOCK=NONE as additional setting. Specifying the lock mode is in general good practice. If an operation cannot be done without a lock (LOCK=NONE) or only with an exlusive lock (LOCK=SHARED), then the ALTER statement would fail with an error. So you do not risk to lock the database when it could not be avoided.

Retrieving odd foreign key names

The following query retrievs all foreign keys with an underscore prefix and produces the ALTER table statements we desperately need for renaming the FKs. It retrieves only the foreign keys from the sakila database.

SELECT
    CONSTRAINT_SCHEMA,
    TABLE_NAME,
    CONSTRAINT_NAME old_name,
    REFERENCED_TABLE_NAME,
    REFERENCED_COLUMN_NAME,
    CASE
        WHEN CONSTRAINT_NAME REGEXP '^\_{1}[A-Za-z0-9]{2}.*$'
            THEN SUBSTR(CONSTRAINT_NAME, 2, LENGTH(CONSTRAINT_NAME))
        WHEN CONSTRAINT_NAME REGEXP '^\_{2}[A-Za-z0-9]{2}.*$'
            THEN SUBSTR(CONSTRAINT_NAME, 3, LENGTH(CONSTRAINT_NAME))
        END AS new_name,
    CONCAT('ALTER TABLE ', TABLE_SCHEMA, '.', TABLE_NAME, ' ADD CONSTRAINT ', (
        CASE
            WHEN CONSTRAINT_NAME REGEXP '^\_{1}[A-Za-z0-9]{2}.*$'
                THEN SUBSTR(CONSTRAINT_NAME, 2, LENGTH(CONSTRAINT_NAME))
            WHEN CONSTRAINT_NAME REGEXP '^\_{2}[A-Za-z0-9]{2}.*$'
                THEN SUBSTR(CONSTRAINT_NAME, 3, LENGTH(CONSTRAINT_NAME))
            END), ' FOREIGN KEY (', COLUMN_NAME, ') REFERENCES ', REFERENCED_TABLE_SCHEMA, '.',
           REFERENCED_TABLE_NAME, '(', REFERENCED_COLUMN_NAME,
           '), ALGORITHM=INPLACE, LOCK=NONE;') AS alter_statement_for_new_name,
    CONCAT('ALTER TABLE ', TABLE_SCHEMA, '.', TABLE_NAME, ' ADD CONSTRAINT ', CONSTRAINT_NAME,
           ' FOREIGN KEY (', COLUMN_NAME, ') REFERENCES ', REFERENCED_TABLE_SCHEMA, '.',
           REFERENCED_TABLE_NAME, '(', REFERENCED_COLUMN_NAME,
           '), ALGORITHM=INPLACE, LOCK=NONE;') AS alter_statement_for_old_name,
    CONCAT('ALTER TABLE ', TABLE_SCHEMA, '.', TABLE_NAME, ' DROP FOREIGN KEY ', CONSTRAINT_NAME,
           ', ALGORITHM=INPLACE, LOCK=NONE;') AS drop_statement,
    CONCAT('ALTER TABLE ', TABLE_SCHEMA, '.', TABLE_NAME, ' ADD CONSTRAINT ', (
        CASE
            WHEN CONSTRAINT_NAME REGEXP '^\_{1}[A-Za-z0-9]{2}.*$'
                THEN SUBSTR(CONSTRAINT_NAME, 2, LENGTH(CONSTRAINT_NAME))
            WHEN CONSTRAINT_NAME REGEXP '^\_{2}[A-Za-z0-9]{2}.*$'
                THEN SUBSTR(CONSTRAINT_NAME, 3, LENGTH(CONSTRAINT_NAME))
            END), ' FOREIGN KEY (', COLUMN_NAME, ') REFERENCES ', REFERENCED_TABLE_SCHEMA, '.',
           REFERENCED_TABLE_NAME, '(', REFERENCED_COLUMN_NAME, ') ', ', DROP FOREIGN KEY ',
           CONSTRAINT_NAME,
           ', ALGORITHM=INPLACE, LOCK=NONE;') AS alter_statement_for_new_name_combined,
    CONCAT('ALTER TABLE ', TABLE_SCHEMA, '.', TABLE_NAME, ' ADD CONSTRAINT ', CONSTRAINT_NAME,
           ' FOREIGN KEY (', COLUMN_NAME, ') REFERENCES ', REFERENCED_TABLE_SCHEMA, '.',
           REFERENCED_TABLE_NAME, '(', REFERENCED_COLUMN_NAME, ') ', ', DROP FOREIGN KEY ',
           (CASE
                WHEN CONSTRAINT_NAME REGEXP '^\_{1}[A-Za-z0-9]{2}.*$'
                    THEN SUBSTR(CONSTRAINT_NAME, 2, LENGTH(CONSTRAINT_NAME))
                WHEN CONSTRAINT_NAME REGEXP '^\_{2}[A-Za-z0-9]{2}.*$'
                    THEN SUBSTR(CONSTRAINT_NAME, 3, LENGTH(CONSTRAINT_NAME))
               END), ', ALGORITHM=INPLACE, LOCK=NONE;') AS alter_statement_for_old_name_combined
FROM INFORMATION_SCHEMA.KEY_COLUMN_USAGE
WHERE CONSTRAINT_SCHEMA = 'sakila'
    AND ASCII(CONSTRAINT_NAME) LIKE ASCII('_%')
    AND REFERENCED_TABLE_NAME IS NOT NULL ;

Changing the foreign keys on the fly

When you can ensure that no changes are happening to the database containing the foreign key you want to rename, the operation itself is only a metadata change and very fast. So it is worth shutting down the applications writing data, ensure that all connections are closed and then run the ALTER statements with the foreign_key_checks disabled.

The proper ALTER statement has the following structure

SET SESSION foreign_key_checks = 0;
ALTER TABLE sakila.Actor ADD CONSTRAINT fk_movie_actor FOREIGN KEY (movie_id) REFERENCES sakila.Movie(id), DROP FOREIGN KEY _fk_movie_actor, ALGORITHM=INPLACE, LOCK=NONE;
SET SESSION foreign_key_checks = 1;

A small hint for working with Integers in MySQL

Integer types in MySQL

A small hint that is not obvious when working with Integers in MySQL. All Integer types in MySQL have a fixed size. This size determines the lower and upper bound of the integer the field can store. You can have signed and unsigned integers, which make this range larger (unsigned) or smaller, because you can also store negative Integers (signed). In either case, the number M in the definition var INT(M) does not limit the actual stored or storable length at all. It is only for display and to indicate developers what kind of length one would expect. It is not a technical constraint. Only the type is (tiniyint, smallint, bigint, etc).

An example using INT(1)

All integer types have a defined range, you can find it in the official documentation. The maximum value for signed integers is 2147483647 and for TINYINT it is 127. If we define an INT(1) the number in the brackets only show how many digits will be displayed when padded with 0.

DROP TABLE my_numbers;
CREATE TABLE my_numbers (
    integerNumber INT(1),
    tinyIntegerNumber TINYINT(1)
) ENGINE InnoDB;

# Max value for integers is 2147483647 and for TINYINT it is 127
INSERT INTO my_numbers(integerNumber, tinyIntegerNumber) VALUES (2147483647, 127);
SELECT * FROM my_numbers;
# Query OK, 1 row affected (0.005 sec)
#
# root@local> SELECT * FROM my_numbers;
# +---------------+-------------------+
# | integerNumber | tinyIntegerNumber |
# +---------------+-------------------+
# |    2147483647 |               127 |
# +---------------+-------------------+
# 1 row in set (0.000 sec)
#

As you can see the table stored both max values although we used INT(1). This exists only because if the database knows how long a number typically is, it can padd it with zeros (if it is told to do so).

Padding with zeros

In the following example, we will padd integers with zero values from the left. Then the setting does have an effect in some clients. The official and the MariaDB command line clients display the leading zeros. Other clients like IntelliJ do not display them.

DROP TABLE IF EXISTS  my_padded_numbers;
CREATE TABLE my_padded_numbers (
    integerNumber INT(64) ZEROFILL,
    tinyIntegerNumber TINYINT(8) ZEROFILL
) ENGINE InnoDB;
# Max value for integers is 2147483647 and for TINYINT it is 127
INSERT INTO my_padded_numbers(integerNumber, tinyIntegerNumber) VALUES (123, 42);
SELECT * FROM my_padded_numbers;
# root@local> INSERT INTO my_padded_numbers(integerNumber, tinyIntegerNumber) VALUES (123, 42);
# Query OK, 1 row affected (0.004 sec)
#
# root@local> SELECT * FROM my_padded_numbers;
# +------------------------------------------------------------------+-------------------+
# | integerNumber                                                    | tinyIntegerNumber |
# +------------------------------------------------------------------+-------------------+
# | 0000000000000000000000000000000000000000000000000000000000000123 |          00000042 |
# +------------------------------------------------------------------+-------------------+
# 1 row in set (0.001 sec)

Conclusion

The M value for declaring integers has nothing to do with the length. This is different when working with VARCHAR for instance, where the number in the brackets indeed defines the maximum capacity.

Connecting to MySQL 5.6 using TLSv1 on Ubuntu 20.04.1

Ubuntu 20.04 updated some security policies which has the effect that some connections might not work anymore. This happened for instance with connections to AWS Aurora 5.6 recently.

Background

AWS Aurora 5.6 only supports TLSv1 for encrypted connection.

This TLS protocol version is considered insecure for some time now and has been disabled in Ubuntu 20.04 and MySQL Client 8 respectively. If MySQL configuration permits TLSv1, TLSv1.1, and TLSv1.2, but your host system configuration permits only connections that use TLSv1.3 or higher, you cannot establish MySQL connections at all, because no protocol permitted by MySQL is permitted by the host system. The problem manifests itself in the following error:

ERROR 2026 (HY000): SSL connection error: error:1425F102:SSL routines:ssl_choose_client_version:unsupported protocol

You can see the supported version on the MySQL server using

SHOW GLOBAL VARIABLES LIKE 'tls_version';

Specifying the protocol version explicitly did not help:

mysql --defaults-extra-file=~/.aws_mysql_aurora --tls-version=TLSv1

The (bug report)[https://bugs.launchpad.net/ubuntu/+source/mysql-8.0/+bug/1872541/comments/27] is also reflected in the official docs, but siumply copying the suggested fix won’t do.

Example of the problem

The following python snippet throws a protocol error with Ubuntu 20.4.

import mysql.connector
from mysql.connector import ClientFlag

config = {
    'user': 'me',
    'password': 'secret',
    'host': '127.0.0.1',
    'port': '3306',
    'database': 'sakila',
    'raise_on_warnings': True,
    'client_flags': [ClientFlag.SSL]
}

cnx = mysql.connector.connect(**config)
cur = cnx.cursor(buffered=True)
cur.execute("SHOW STATUS LIKE 'Ssl_cipher'")
print(cur.fetchone())
cur.close()
cnx.close()

The error thrown by Python is

mysql.connector.errors.InterfaceError: 2055: Lost connection to MySQL server at '127.0.0.1:8001', system error: 1 [SSL: UNSUPPORTED_PROTOCOL] unsupported protocol (_ssl.c:1108)

The quick fix

It is possible to lower the TLS version requirements in the openssl config of Ubuntu. But in order for this to work with Aurora 5.6, you need to lower the TLS version to TLSv1. This can be achieved by adapting the OpenSSL settings in /etc/ssl/openssl.cnf.

First add a default section on top of the file:

openssl_conf = default_conf

and then at the end of the file add:

[ default_conf ]

ssl_conf = ssl_sect

[ssl_sect]

system_default = system_default_sect

[system_default_sect]
MinProtocol = TLSv1
MaxProtocol = None
CipherString = DEFAULT:@SECLEVEL=1

This lowers the allower TLS version tro TLSv1 again. Now the python script from above can be executed.

Proper fix

The solution above can also be used by applying the SSL configuration only to the current script and not the whole operating system. This is of course the wiser plan and should therefore be used. In order to use TLSv1 with Python you can

  1. Create a virtual environment with proper versions for the relevant packages
  2. Load the openssl configuration from above as an environment file

Requirements for Python

The following dependencies can be defined in a requirements.txt file.

mysql-connector-python==8.0.22
pandas==1.2.0
pkg-resources==0.0.0
SQLAlchemy==1.3.22

Virtual Environment

You can also use the following snippet for a Makefile to create the virtual environment. My colleague Jonas suggested the following code:

venv: requirements.txt
	test -d venv || python3 -m venv venv
	venv/bin/pip3 install --upgrade pip setuptools
	venv/bin/pip3 install -Ur requirements.txt
	touch venv/bin/activate

Environment Variables in the Terminal

In order to connect you need to set the following environment variables. Make sure to use a full path for the openssl.cfg file. You can write those variables into a file called .venv and then source it: source .venv. Note that this is obviously sensitive data.

export OPENSSL_CONF=/full/path/to/config/openssl.cfg
export DB_HOST=127.0.0.1
export DB_PORT=3306
export DB_USER=alice
export DB_PASSWORD=SECRET
export DB_NAME=sakila

Environment Variables in IntelliJ

The same method also works when you set the environment variables in the run / debug configuration of IntelliJ. You need to make sure that you use the right venv as interpreted for the project.

  1. Create a new virtual environment venv using make venv
  2. Set this environment as the interpreter of this project: File –> Project Structure –> Project SDK
  3. Create a new run / debug configuration and add the environment variables from above
  4. Make sure the run configuration uses the SDK

Python Example

Then you can use the following snippet.

import mysql.connector
import sqlalchemy as sqlalchemy
from mysql.connector.constants import ClientFlag
import pandas as pd

import logging
logging.basicConfig(
    format='%(asctime)s %(levelname)-8s %(message)s',
    level=logging.INFO,
    datefmt='%Y-%m-%d %H:%M:%S')

sql_query = """
SELECT
    last_name
FROM sakila.actor
ORDER BY actor_id DESC
LIMIT 10
"""

def get_connection_config():
    """
    OPENSSL_CONF=/full/path/to/config/openssl.cfg
    DB_HOST=127.0.0.1
    DB_PORT=3306
    DB_USER=alice
    DB_PASSWORD=SECRET
    DB_NAME=sakila

    :return: db_config_dict
    """
    if(os.getenv('DB_PASSWORD') != None):
        mysql_config = {
            'host': os.getenv('DB_HOST'),
            'port': os.getenv('DB_PORT'),
            'user': os.getenv('DB_USER'),
            'password': os.getenv('DB_PASSWORD'),
            'database': os.getenv('DB_NAME'),
            'client_flags': [ClientFlag.SSL]
        }
        return mysql_config
    else:
        print("You need to set the env variables")
        exit(1)

if __name__ == "__main__":
    mysql_config = get_connection_config()

    """Use a cursor object
    
    You can retrieve data by using a cursor object and iterate over the results.
    Close cursors and connections when done.
    """

    mysql_connection = mysql.connector.connect(**mysql_config)

    cursor = mysql_connection.cursor()
    cursor.execute(sql_query)

    for (_username) in cursor:
        logging.info("Actor: {}".format(last_name))

    cursor.close()
    mysql_connection.close()

    """Use Pandas for retrieving data
    
    The more convenient way of retrieving data is to use Pandas.
    It will return a data frame and you can easily paginate large result sets in a loop.
    
    """
    mysql_connection = mysql.connector.connect(**mysql_config)
    for chunk in pd.read_sql_query(con=mysql_connection, sql=sql_query, chunksize = 5):
        logging.info("last_name: {}".format(chunk['last_name']))

    exit(0)

You can find the code also at my Github repository.

Workaround

If the hack above should not work, what will help is downgrading the MySQL Client to the Version 5.7. I downloaded the bundle from here and unpacked it. Then I installed the following packages:

sudo apt-get install libtinfo5 libaio1
sudo dpkg -i mysql-common_5.7.31-1ubuntu18.04_amd64.deb
sudo dpkg -i mysql-community-client_5.7.31-1ubuntu18.04_amd64.deb

Then I could connect again without any extra settings and flags.

Update 2020-10-14

The workaround stopped to function for some reason. I then found this trick described here which offers a temporary fix. It uses a local configuration file for openssl. This file can then be used for single commands by prefixing the variable. Save the configuration below in a file, for instance ~/.openssl_allow_tls1.0.cnf.

openssl_conf = openssl_init

[openssl_init]
ssl_conf = ssl_sect

[ssl_sect]
system_default = system_default_sect

[system_default_sect]
CipherString = DEFAULT@SECLEVEL=1

and then export this in a terminal export OPENSSL_CONF=~/configurations/ssl/openssl_allow_tls1.0.cnf.

Update 2020-10-19

If you need to update your system, make sure to hold the installed MySQL 5.7 version of the client. You could see which version would be installed if you would upgrade now:

$ apt-cache policy mysql-community-client mysql-common

mysql-community-client:
  Installed: 5.7.31-1ubuntu18.04
  Candidate: 8.0.22-1ubuntu20.04
  Version table:
     8.0.22-1ubuntu20.04 500
        500 http://repo.mysql.com/apt/ubuntu focal/mysql-8.0 amd64 Packages
 *** 5.7.31-1ubuntu18.04 100
        100 /var/lib/dpkg/status
mysql-common:
  Installed: 5.7.31-1ubuntu18.04
  Candidate: 8.0.22-1ubuntu20.04
  Version table:
     8.0.22-1ubuntu20.04 500
        500 http://repo.mysql.com/apt/ubuntu focal/mysql-8.0 amd64 Packages
     5.8+1.0.5ubuntu2 500
        500 http://at.archive.ubuntu.com/ubuntu focal/main amd64 Packages
        500 http://at.archive.ubuntu.com/ubuntu focal/main i386 Packages
 *** 5.7.31-1ubuntu18.04 100
        100 /var/lib/dpkg/status

Then you can pin the version to 5.7 using a wildcard *1 by adding the packages to /etc/apt/preferences.

Package: mysql-common
Pin: version 5.7.*
Pin-Priority: 1001

Package: mysql-community-client
Pin: version 5.7.*
Pin-Priority: 1001

Package: libmysqlclient21
Pin: version 5.7.*
Pin-Priority: 1001

Setup a SSH tunnel in IntelliJ

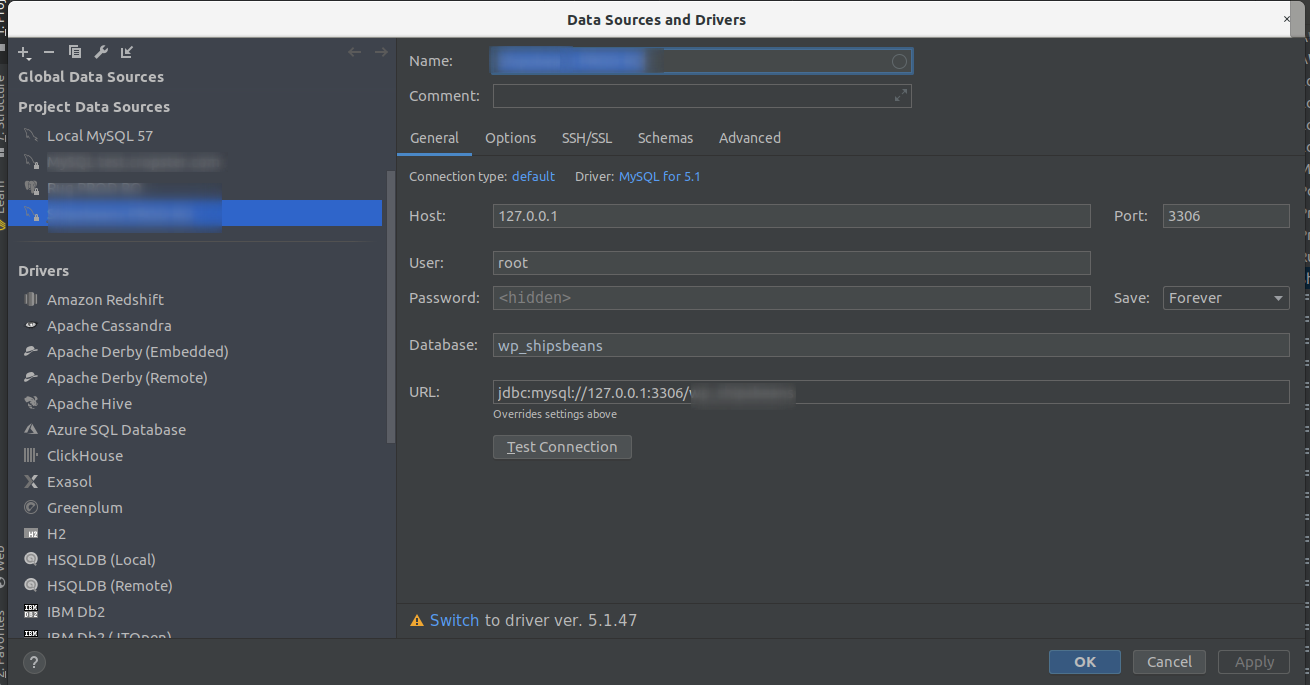
There seems to be a problem with the older MySQL driver and IntelliJ Ultimate. When I tried to connect to a remote MySQL instance using a tunnel, IntelliJ would refuse to connect. IntelliJ would show an error similar to the following:

Cannot connect to a database. Tried three times.

The linked online help page was not really helpful. I could create the tunnel manually and verify the settings, all seemed fine. As a next step I inspected the MySQL error log on the remote server and noticed that errors in relation to my connection attempts wer showing. Thus I knew at least that the connection issue was not caused by SSH, but rather seems to be related to MySQL.

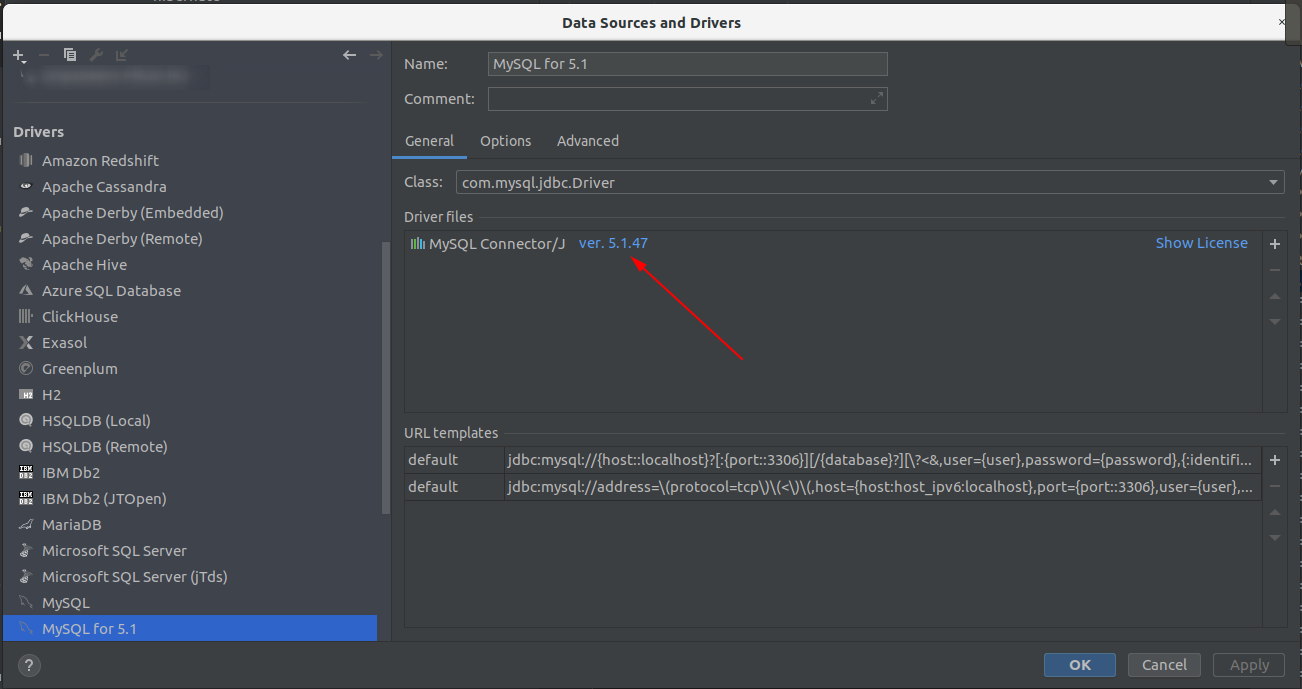
I then upgraded the MySQL driver and the connection worked out of the box. I use a SSH config section similar to this:

Host remote-mysql-database-server
	User bob
	Hostname 10.20.30.40
	IdentityFile ~/.ssh/rsa_id

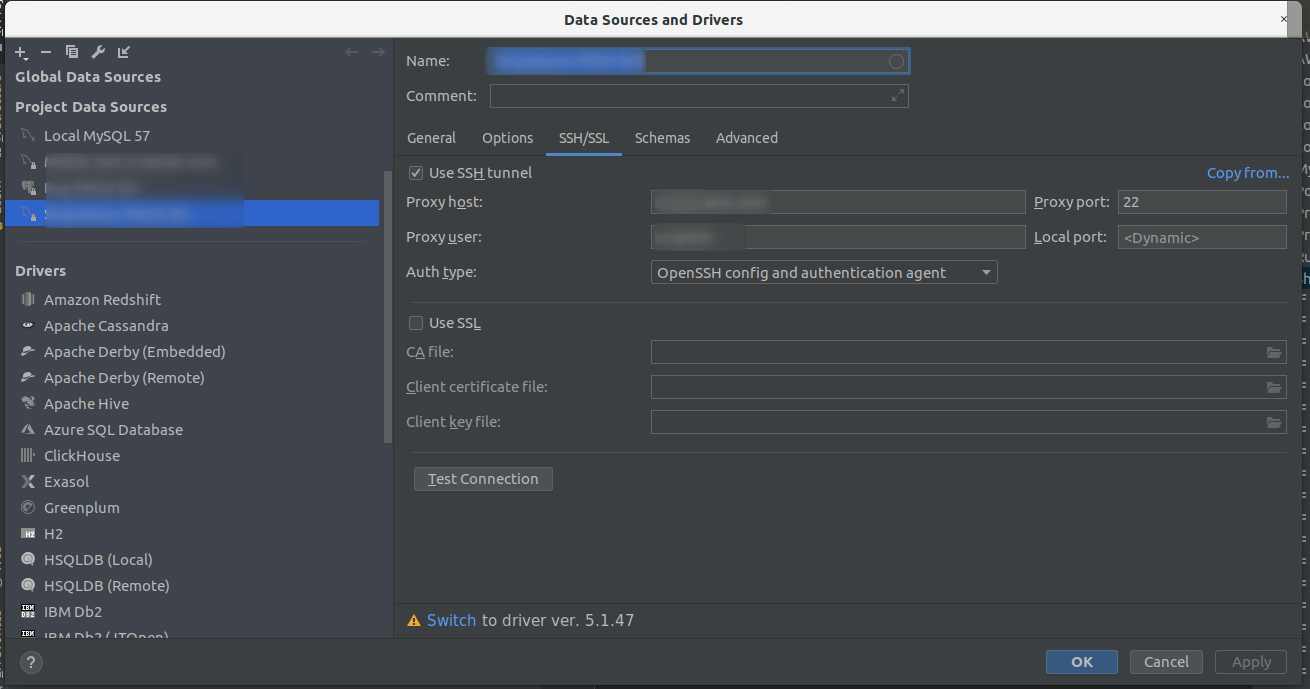
This can then be used in IntelliJ. For more complex setups, for instance when you need to connect to AWS RDS and have to use a bastion host, I found it easier to setup the connection details also in the SSH config file and keep the IntelliJ configuration simple.

IntelliJ MySQL settings

MySQL Driver

SSH settings

Demystifying MySQL User Management (Part 1)

Managing user accounts can be a bit confusing, when working with MySQL. The two main commands in that context: CREATE USER and GRANT. Obviously, CREATE user is for adding a new user while GRANT is used for assigning permissions.

Pre-requisits: Docker Compose

For testing access to a MySQL instance, we can use Docker for running said instance and two different client containers. The docker-compose snipped below orchestrates those three containers and puts them on a shared network.

version: '3'
services:
  mysql-db:
    image: mysql:8
    container_name: mysql-8-server
    restart: unless-stopped
    command: --default-authentication-plugin=mysql_native_password
    environment:
      MYSQL_DATABASE: 'world'
      MYSQL_ALLOW_EMPTY_PASSWORD: 'yes'      
    ports:
      - '3308:3306'
    expose:
      - '3306'      
    volumes:
      - my-data-volume:/var/lib/mysql
      - ./demo_data/world.sql:/docker-entrypoint-initdb.d/world.sql:ro
    networks:
      mysql-test-net:
        ipv4_address: 172.28.1.2
  mysql-client-1:
    image: alpine-mysql:latest
    container_name: client-1
    restart: unless-stopped
    command: tail -f /dev/null
    networks:
      mysql-test-net:
        ipv4_address: 172.28.1.3
  mysql-client-2:
      image: alpine-mysql:latest
      container_name: client-2
      restart: unless-stopped
      command: tail -f /dev/null
      networks:
        mysql-test-net:
          ipv4_address: 172.28.1.4
volumes:
  my-data-volume:
networks:
    mysql-test-net:
        ipam:
            driver: default
            config:
                - subnet: 172.28.0.0/16

The docker-compose script is pretty self explainatory. We use a MySQL 8 container, that allows connecting with the root user and an empty password. We persist the data of the MySQL database in a seperate data volume called my-data-volume and we also load the example database called world which we downloaded before.

In order to have a nice and simple image for the clients., we can use the Alpine image and pre-install the MySQL client inside it, by using the following Dockerfile.

FROM alpine:3.7
RUN apk add --no-cache mysql-client

You need to build it once on your host with the command

docker build --tag alpine-mysql:latest .

After starting docker-compose with docker-compose up, We end up with three containers:

  • mysql-8-server
  • client-1
  • client-2

MySQL User Accounts, Access and Permissions

In this blog post, I would like to highlight some issues that arise when you add accounts for users that can connect from different hosts. Our docker container accepts connections for root from any host. In the wild, this is of course bad practice and we are going to change that as soon as we have added a second account.

Connect to the MySQL server by starting the MySQL client inside the container client-1 and point it to the right host by providing the hostname of the database server. Docker resolves the container names for us nicely, because all three containers are inside the same network. In order to improve the readability, we also changed the prompt so that it is more obvious from which client we are connecting to.

$ docker exec -it client-1 mysql -uroot -h mysql-8-server --prompt "Client 1 >"
Welcome to the MariaDB monitor.  Commands end with ; or \g.
Your MySQL connection id is 9
Server version: 8.0.12 MySQL Community Server - GPL

Copyright (c) 2000, 2018, Oracle, MariaDB Corporation Ab and others.

Type 'help;' or '\h' for help. Type '\c' to clear the current input statement.

Client 1 >

The Root User

Lets make our example more secure by allowing root to connect only from the machine where the database instance is running at. Being still connected from client-1 as root, we can change the permissions. But lets have a look what users are there anyways.

Client 1 >SELECT User, Host, authentication_string  FROM mysql.user\G
*************************** 1. row ***************************
                 User: root
                 Host: %
authentication_string: 
*************************** 2. row ***************************
                 User: mysql.infoschema
                 Host: localhost
authentication_string: $A$005$THISISACOMBINATIONOFINVALIDSALTANDPASSWORDTHATMUSTNEVERBRBEUSED
*************************** 3. row ***************************
                 User: mysql.session
                 Host: localhost
authentication_string: $A$005$THISISACOMBINATIONOFINVALIDSALTANDPASSWORDTHATMUSTNEVERBRBEUSED
*************************** 4. row ***************************
                 User: mysql.sys
                 Host: localhost
authentication_string: $A$005$THISISACOMBINATIONOFINVALIDSALTANDPASSWORDTHATMUSTNEVERBRBEUSED
*************************** 5. row ***************************
                 User: root
                 Host: localhost
authentication_string: 
5 rows in set (0.00 sec)

As we can see there are five preinstalled accounts The users mysql.infoschema, mysql.session and mysql.sys are internal accounts that cannot be used for client connections. Do not delete them though, they are needed for internal tasks. Then there are two root accounts: ‘root’@’%’ and ‘root’@’localhost’. The first one is the problematic one, because with the wildcard ‘%’, clients can connect from any remote computer. We definetely do not want that.

So lets drop it:

DROP USER 'root'@'%';

When you now run the SELECT query again, you will notice that it still works. Even after you run FLUSH PRIVILEGES. The reason is that the server will verify the connection settings only after the next time the client connects. So lets exit the session and try to connect again.

$ docker exec -it client-1 mysql -uroot -h mysql-8-server --prompt "Client 1 >"
ERROR 1130 (HY000): Host '172.28.1.3' is not allowed to connect to this MySQL server

As expected, we cannot connect from a remote server anymore. Lets login using MySQL container.

docker exec -it mysql-8-server  mysql -uroot -h localhost --prompt "Server >"
Welcome to the MySQL monitor.  Commands end with ; or \g.
Your MySQL connection id is 11
Server version: 8.0.12 MySQL Community Server - GPL

Copyright (c) 2000, 2018, Oracle and/or its affiliates. All rights reserved.

Oracle is a registered trademark of Oracle Corporation and/or its
affiliates. Other names may be trademarks of their respective
owners.

Type 'help;' or '\h' for help. Type '\c' to clear the current input statement.

Server >

Note how we are now connecting to the mysql-8-server and using localhost as the hostname.

Localhost vs 127.0.0.1

In the example above we connected using localhost as the hostname. When we try the same with the IP address 127.0.0.1 of the loopback interface, which is often seen as synonymous, it does not work anymore.

docker exec -it mysql-8-server  mysql -uroot -h 127.0.0.1 --prompt "Server >"ERROR 1130 (HY000): Host '127.0.0.1' is not allowed to connect to this MySQL server

This is confusing, after all (after using apt-get install inetutils-ping for installing the tool inside the MySQL container), we can verify that localhost resolves to 127.0.0.1.

But there is more to that. First of all, MySQL can use hostname resolution and would make a DNS request to get the IP address from a hostname. As this can be pretty slow, it is turned off by default, as you can verify like this:

Server >show variables like 'skip_name_resolve';
+-------------------+-------+
| Variable_name     | Value |
+-------------------+-------+
| skip_name_resolve | ON    |
+-------------------+-------+
1 row in set (0.00 sec)

Further more, localhost is a special hostname for MySQL. You can connect to MySQL either by using a TCP connection or a file socket. The file socket only works on the same machine as the server is running and it is the faster method. This is why MySQL treats connections coming from localhost per default as socket connections. If you want to use 127.0.0.1, you can add this as a second host for the existing user using GRANT.

Server >GRANT ALL PRIVILEGES ON *.* TO 'root'@'127.0.0.1';
ERROR 1410 (42000): You are not allowed to create a user with GRANT

Now thats weird? After all, we are root and should be allowed to do anything, but we see this error message above. The reason is that there does not yet exist an account for ‘root’@’127.0.0.1’ yet.

Server >CREATE USER 'root'@'127.0.0.1' IDENTIFIED BY 'super-secret';
Query OK, 0 rows affected (0.07 sec)

Server >GRANT ALL PRIVILEGES ON *.* to 'root'@'127.0.0.1';
Query OK, 0 rows affected (0.07 sec)

Server >GRANT GRANT OPTION ON *.* to 'root'@'127.0.0.1';
Query OK, 0 rows affected (0.08 sec)

You always need to create a user account first before setting permissions with GRANT.

While we are at it, we can also set a password for root. Note how we set the password for both root accounts. Accounts are always identified with ‘username’@’hostname’.

Server >ALTER USER 'root'@'localhost' IDENTIFIED BY 'super-secret';
Server >ALTER USER 'root'@'127.0.0.1' IDENTIFIED BY 'super-secret';

Adding Users

Let’s logon with our new credentials again and create a new user called bob and add some permissions for the world database.

CREATE USER 'bob' IDENTIFIED BY 'secret';

What looks pretty harmless adds an account for the user called bob. Without adding a host, MySQL simply adds the wildcard for hosts and allows therefore connecting to the MySQL instance from any IP address. You can verify it with the follwing command that I am going to use more often in the course of this post.

Server >SHOW GRANTS FOR 'bob';
+---------------------------------+
| Grants for bob@%                |
+---------------------------------+
| GRANT USAGE ON *.* TO `bob`@`%` |
+---------------------------------+
1 row in set (0.00 sec)

Thats not what we had in mind. Lets delete bob’s account again and create it with a proper host.

DROP USER 'bob';
CREATE USER 'bob'@'172.28.1.3' IDENTIFIED BY 'secret';

Note how we limited the account to allow connections only from Client 1, by provoding its IP. You can’t connect from Client 2.

stefan@stefan-desktop:~/Docker-Projects/MySQL-Demo$ docker exec -it client-1 mysql -ubob -h mysql-8-server -psecret --prompt "Client 1 >"
Welcome to the MariaDB monitor.  Commands end with ; or \g.
Your MySQL connection id is 14
Server version: 8.0.12 MySQL Community Server - GPL

Copyright (c) 2000, 2018, Oracle, MariaDB Corporation Ab and others.

Type 'help;' or '\h' for help. Type '\c' to clear the current input statement.

Client 1 >exit
Bye
stefan@stefan-desktop:~/Docker-Projects/MySQL-Demo$ docker exec -it client-2 mysql -ubob -h mysql-8-server -psecret --prompt "Client 2 >"
ERROR 1045 (28000): Access denied for user 'bob'@'172.28.1.4' (using password: YES)

This are the very basics of MySQL account management. In the future I plan to go into more details.

Lightning fast integration tests with Docker, MySQL and tmpfs

Integration tests that involve database operations requite to tear down and re-initialize a database multiple times. Although most developer machines offer SSD and enough RAM, database initialization can consume a considerable amount of time nevertheless.

Docker allows defining volumes that are mounted directly into the memory by using tmpfs. We can utilize this feature to utilize the speed up disk operations as during database imports, by moving the data from the disk into the memory.

The following example measures the time for writing 1GB worth of data to an SSD:

dd if=/dev/zero of=/tmp/output bs=1024k count=1024; 
1024+0 Datensätze ein
1024+0 Datensätze aus
1073741824 bytes (1,1 GB, 1,0 GiB) copied, 2,22033 s, 484 MB/s</code>```


For comparison, the following steps create a RAM disk and write the data to memory.

$ sudo mount -o size=1G -t tmpfs none /tmp/tmpfs

$ dd if=/dev/zero of=/tmp/tmpfs/output bs=1024k count=1024; 1024+0 Datensätze ein 1024+0 Datensätze aus 1073741824 bytes (1,1 GB, 1,0 GiB) copied, 0,309017 s, 3,5 GB/s


As you can see writing 1GB to memory is 7x faster. With the following Docker run command, you can spin-up a default MySQL container, where the data directory resides in a tmpfs.

docker run -d
–rm
–name mysql-56-in-memory
-p 3307:3306
–tmpfs /var/lib/mysql:rw,noexec,nosuid,size=1024m
-e MYSQL_ALLOW_EMPTY_PASSWORD=TRUE
-e MYSQL_DATABASE=dev
mysql:5.6


The arguments of Docker run mean the following

  * &#8211;rm: delete the container once it was stopped
  * &#8211;name: a name for the container
  * -p: map the host&#8217;s port 3307 to the port 3306 inside the container. This allows to run multiple MySQL containers in parallel and connect to them from the host via the port specified
  * &#8211;tmpfs: This line mounts the internal directory of the container to a RAM disk. It should be writeable (rm). Noexec prevents the execution of binaries, nosuid prevents changing the permission flags and the size specifies the size occupied by the tmpfs partition in memory. Adapt this to your usecase. The minimum for MySQL is around 200MB. Add the space needed for your data, indices etc.
  * MYSQL\_ALLOW\_EMPTY_PASSWORD does what it implies
  * MYSQL_DATABASE defines the name of a database to be created

If you run this command you can connect to the container like this: _mysql -u root -h 127.0.0.1 -P 3307_

The container behaves like a normal MySQL database, unless the data is not persisted on a hard disk, but only stored in the ephemeral memory. If you stop the container, it will be removed by docker and if you reboot the machine the data will be gone. for obvious reasons this is only a good idea for test data that can be re-created at any time.

You can achieve the same also with Docker Compose if you would like to orchestrate multiple containers.

version: ‘3’ services: mysql-56-integration: container_name: mysql-56-in-memory restart: unless-stopped image: mysql:5.6 environment: - MYSQL_ALLOW_EMPTY_PASSWORD='true’ - MYSQL_HOST=’’ volumes: - data:/var/cache ports: - “3307:3306”

volumes: data: driver_opts: type: tmpfs device: tmpfs```

Setup AWS MySQL 5.6 Aurora as a Slave for an external Master with SSL

Setting up Aurora as a slave for an external MySQL server that acts as the master is a bit tricky. Of course we want a secured connection. For this reason we need to create client certificates to be used by AWS RDS. The steps below should work for RDS as well.

Generate and Sign the Certificates

The process is actually simple, but AWS is picky how you generate the certificates. I was using a SHA flag that was accepted by a regular MySQL 5.6 instance, but caused a cryptic (pun intended) MySQL 2026 Generic SSL error and it was quite hard to find the source. Also note that you need to have different common names (CN) for all three certificate pairs. They do not necessarily need to fit the actual domain name, but they need to be different. 

First we need to create the certificate authority that can sign the keys

# Generate a certificate authority key pair
openssl genrsa 2048 > ca-key.pem
# Notice the CN name. It needs to be different for all of the three key pairs that we create!
openssl req -new -x509 -nodes -days 3600 -key ca-key.pem -out ca.pem -subj "/C=AT/ST=Tirol/L=Innsbruck/O=The Good Corp/OU=IT Department/CN=ca.mysql"

Then create the server key pair

#Generate a server key. Note again the different CN
openssl req -newkey rsa:2048 -days 3600 -nodes -keyout server-key.pem -out server-req.pem -subj "/C=AT/ST=Tirol/L=Innsbruck/O=The Good Corp/OU=IT Department/CN=server.mysql"
# Convert the format
openssl rsa -in server-key.pem -out server-key.pem
# Sign it
openssl x509 -req -in server-req.pem -days 3600 -CA ca.pem -CAkey ca-key.pem -set_serial 01 -out server-cert.pem

Finally we generate a client certificate and its key. You can repeat these steps to generate multiple certificates for clients

# Again, note the CN
openssl req -newkey rsa:2048 -days 3600 -nodes -keyout client-key.pem -out client-req.pem -subj "/C=AT/ST=Tirol/L=Innsbruck/O=The Good Corp/OU=IT Department/CN=client.mysql"
# Convert
openssl rsa -in client-key.pem -out client-key.pem
# Sign
openssl x509 -req -in client-req.pem -days 3600 -CA ca.pem -CAkey ca-key.pem -set_serial 01 -out client-cert.pem
# Verify
openssl verify -CAfile ca.pem server-cert.pem client-cert.pem

Now we have all the certs we need.

Master Setup

The setup is pretty standard. Add the server certificates to the MySQL configuration of your master and restart.

# SSL Server Certificate
ssl-ca=/etc/mysql/ssl/ca.pem
ssl-cert=/etc/mysql/ssl/server-cert.pem
ssl-key=/etc/mysql/ssl/server-key.pem

Then create a user for the slave

CREATE USER 'aws'@'%' IDENTIFIED BY 'SECRET';
GRANT REPLICATION CLIENT, REPLICATION SLAVE ON *.* TO 'aws'@'%' IDENTIFIED BY 'SECRET' REQUIRE SSL;```


# Slave Setup

On AWS you do not have SUPER() privileges, but can use stored procedures provided by Amazon to setup the slave.

Start fresh by removing old records. If there was no previous setup, there might be an error.

CALL mysql.rds_remove_binlog_ssl_material; CALL mysql.rds_reset_external_master;


Now you need to pass the client certificate data as a JSON to AWS Aurora.

CALL mysql.rds_import_binlog_ssl_material('{“ssl_ca”:"—–BEGIN CERTIFICATE—– MIIBAgMBVRpcm9sMRIw… … —–END CERTIFICATE—–\n”,“ssl_cert”:"—–BEGIN CERTIFICATE—– KAoIBAQCzn28awhyN8V56Z2bskCiMhJt4 … —–END CERTIFICATE—–\n”,“ssl_key”:"—–BEGIN RSA PRIVATE KEY—– SbeLNsRzrPoCVGGqwqR6gE6AZu … —–END RSA PRIVATE KEY—–"}');


A message that the SSL data was accepted will appear if you pasted the certificate, the key and the CA certificate correctly.

Finally, start the replication and check the status

CALL mysql.rds_start_replication; SHOW SLAVE STATUS\G```

Tests and Troubleshooting

On the master, you can check if the slave even tries to connect for instance with tcpdump. In the example below the IP 1.2.3.4 would be the AWS gateway address as seen by your firewall.

sudo tcpdump src host 1.2.3.4 -vv```


<div class="twttr_buttons">
  <div class="twttr_twitter">
    <a href="http://twitter.com/share?text=Setup+AWS+MySQL+5.6+Aurora+as+a+Slave+for+an+external+Master+with+SSL" class="twitter-share-button" data-via="" data-hashtags=""  data-size="default" data-url="https://blog.stefanproell.at/2018/11/30/setup-aws-mysql-5-6-aurora-as-a-slave-for-an-external-master-with-ssl/"  data-related="" target="_blank">Tweet</a>
  </div>
  
  <div class="twttr_followme">
    <a href="https://twitter.com/@stefanproell" class="twitter-follow-button" data-show-count="true" data-size="default"  data-show-screen-name="false"  target="_blank">Follow me</a>
  </div>
</div>

Illegal mix of collations: IntelliJ and UTF8mb4

When using variables inside SQL scripts within IntelliJ products (e.g. DataGrip), certain queries will not work because the encodings of the IntelliJ client and the server missmatch. This occurs for instance when you compare variables. A typical error message looks like this:

[HY000][1267] Illegal mix of collations (utf8mb4_unicode_520_ci,IMPLICIT) \
   and (utf8mb4_general_ci,IMPLICIT) for operation 'like'```


IntelliJ products do not yet support MySQL&#8217;s utf8mb4 character set encodings. The problem occurs when using variables in queries. Per default. IntelliJ uses a UTF-8 encoding for the connection. When you use utf8mb4 as the database default character set, then variables will be encoded in UTF-8 while the database content remailns in utf8mb4. It is not possible to provide the character set encodings to the IntelliJ settings, as it will refuse to connect.

Check your server settings using the MySQL client:

MySQL [cropster_research]> show variables like ‘%char%'; +————————–+—————————-+ | Variable_name | Value | +————————–+—————————-+ | character_set_client | utf8mb4 | | character_set_connection | utf8mb4 | | character_set_database | utf8mb4 | | character_set_filesystem | binary | | character_set_results | utf8 | | character_set_server | utf8mb4 | | character_set_system | utf8 | | character_sets_dir | /usr/share/mysql/charsets/ | +————————–+—————————-+


This seems correct, but when you connect with the IntelliJ client, you will get wrong results when you use variables. Until the products supportutf8mb4, you would need to add the following settings to the script in order to force the right settings.

SET character_set_connection=utf8mb4; SET collation_connection=utf8mb4_unicode_520_ci;```

Verifying Replication Consistency with Percona’s pt-table-checksum

Replication is an important concept for improving database performance and security. In this blog post, I would like to demonstrate how the consistency between a MySQL master and a slave can be verified. We will create two Docker containers, one for the master one for the slave.

Installing the Percona Toolkit

The Percona Toolkit is a collection of useful utilities, which can be obained for free from the company’s portal. The following commands install the prerequisits, download the package and eventually the package.

sudo apt-get install -y wget libdbi-perl libdbd-mysql-perl libterm-readkey-perl libio-socket-ssl-perl
wget https://www.percona.com/downloads/percona-toolkit/3.0.4/binary/debian/xenial/x86_64/\
    percona-toolkit_3.0.4-1.xenial_amd64.deb
sudo dpkg -i percona-toolkit_3.0.4-1.xenial_amd64.deb 

Setting up a Test Environment with Docker

The following command creates and starts a docker container. Note that these are minimal examples and are not suitable for a serious environment.

docker run --name mysql_master -e MYSQL_ALLOW_EMPTY_PASSWORD=true -d mysql:5.6 --log-bin \
   --binlog-format=ROW --server-id=1```


Get the IP address from the master container:

Get the IP of the master

docker inspect mysql_master | grep IPAddress

“SecondaryIPAddresses”: null, “IPAddress”: “172.17.0.2"```

You can connect to this container like this and verify the server id:

stefan@Lenovo ~/Docker-Projects $ mysql -u root -h 172.17.0.2
Welcome to the MySQL monitor.  Commands end with ; or \g.
Your MySQL connection id is 1
Server version: 5.6.35-log MySQL Community Server (GPL)

Copyright (c) 2000, 2017, Oracle and/or its affiliates. All rights reserved.

Oracle is a registered trademark of Oracle Corporation and/or its
affiliates. Other names may be trademarks of their respective
owners.

Type 'help;' or '\h' for help. Type '\c' to clear the current input statement.

mysql> show variables like 'server_id';
+---------------+-------+
| Variable_name | Value |
+---------------+-------+
| server_id     | 1     |
+---------------+-------+
1 row in set (0,00 sec)

We repeat the command for the slave, but use a different id. port and name:

docker run --name mysql_slave -e MYSQL_ALLOW_EMPTY_PASSWORD=true -d mysql:5.6 --server-id=2```


For simplicity, we did not use Docker links, but will rather use IP addresses assigned by Docker directly.

## Replication Setup

First, we need to setup a user with replication privileges. This user will connect from the slave to the master.

On the host, interact with the master container

Get the IP address of the slave container

$ docker inspect mysql_slave | grep IPAddress “SecondaryIPAddresses”: null, “IPAddress”: “172.17.0.3”, “IPAddress”: “172.17.0.3”,

Login to the MySQL console of the master

Grant permissions

GRANT REPLICATION SLAVE ON . TO replication@‘172.17.0.3’ IDENTIFIED BY ‘SLAVE-SECRET’;

Get the current binlog position

mysql> SHOW MASTER STATUS; +——————-+———-+————–+——————+——————-+ | File | Position | Binlog_Do_DB | Binlog_Ignore_DB | Executed_Gtid_Set | +——————-+———-+————–+——————+——————-+ | mysqld-bin.000002 | 346 | | | | +——————-+———-+————–+——————+——————-+ 1 row in set (0,00 sec)```

Now log into the slave container and add the connection details for the master:

## Connect to the MySQL Slave instance
$ mysql -u root -h 172.17.0.3

### Setup the slave

mysql> CHANGE MASTER TO   
  MASTER_HOST='172.17.0.2',
  MASTER_PORT=3306,
  MASTER_USER='replication', 
  MASTER_PASSWORD='SLAVE-SECRET',
  MASTER_LOG_FILE='mysqld-bin.000002', 
  MASTER_LOG_POS=346;
Query OK, 0 rows affected, 2 warnings (0,05 sec)

### Start and check
mysql>   start slave;
Query OK, 0 rows affected (0,01 sec)

mysql> show slave status \G
*************************** 1. row ***************************
               Slave_IO_State: Waiting for master to send event
                  Master_Host: 172.17.0.2
                  Master_User: percona
                  Master_Port: 3306
                Connect_Retry: 60
              Master_Log_File: mysqld-bin.000002
          Read_Master_Log_Pos: 346
               Relay_Log_File: mysqld-relay-bin.000002
                Relay_Log_Pos: 284
        Relay_Master_Log_File: mysqld-bin.000002
             Slave_IO_Running: Yes
            Slave_SQL_Running: Yes

Now our simple slave setup is running.

Get some test data

Lets download the Sakila test database and import it into the master. It will be replicated immediately.

wget http://downloads.mysql.com/docs/sakila-db.tar.gz
~/Docker-Projects $ tar xvfz sakila-db.tar.gz 

mysql -u root -h 172.17.0.2 < sakila-db/sakila-schema.sql 
mysql -u root -h 172.17.0.2 < sakila-db/sakila-data.sql```


Verify that the data is on the slave as well:

mysql -u root -h 172.17.0.3 -e “USE sakila;SHOW TABLES;” +—————————-+ | Tables_in_sakila | +—————————-+ | actor | | actor_info | | address | | category | | city | | country | | customer | … | store | +—————————-+


After our setup is completed, we can proceed with Percona pt-table checksum.

# Percona pt-table-checksum

The Percona pt-table-checksum tool requires the connection information of the master and the slave in a specific format. This is called the DSN (data source name), which is a coma separated string. We can store this information in a dedicated database called percona in a table called dsns. We create this table on the master. Note that the data gets replicated to the slave within the blink of an eye.

CREATE DATABASE percona; USE percona;

CREATE TABLE DSN-Table ( id int(11) NOT NULL AUTO_INCREMENT, dsn varchar(255) NOT NULL, PRIMARY KEY (id) );


The next step involves creating permissions on the slave and the master!

GRANT REPLICATION SLAVE,PROCESS,SUPER, SELECT ON . TO ‘percona’@‘172.17.0.1’ IDENTIFIED BY ‘SECRET’; GRANT ALL PRIVILEGES ON percona.* TO ‘percona’@‘172.17.0.1’;```

The percona user is needed to run the script. Note that the IP address is this time from the (Docker) host, having the IP 172.17.0.1 by default. In real world scenarios, this script would either be run on the master or on the slave directly.

Now we need to add the information about the slave to the table we created. The Percona tool could also read this from the process list, but it is more reliable if we add the information ourselves. To do so, we add a record to the table we just created, which describes the slave DSN:

INSERT INTO percona.DSN-Table VALUES (1,'h=172.17.0.3,u=percona,p=SECRET,P=3306');```


The pt-table-checksum tool the connects to the master instance and the the slave. It computes checksums of all databases and tables and compares results. You can use the tool like this:

pt-table-checksum –replicate=percona.checksums –create-replicate-table –empty-replicate-table
–recursion-method=dsn=t=percona.DSN_Table -h 172.17.0.2 -P 3306 -u percona -pSECRET TS ERRORS DIFFS ROWS CHUNKS SKIPPED TIME TABLE 09-10T10:13:11 0 0 0 1 0 0.020 mysql.columns_priv 09-10T10:13:11 0 0 3 1 0 0.016 mysql.db 09-10T10:13:11 0 0 0 1 0 0.024 mysql.event 09-10T10:13:11 0 0 0 1 0 0.014 mysql.func 09-10T10:13:11 0 0 40 1 0 0.026 mysql.help_category 09-10T10:13:11 0 0 614 1 0 0.023 mysql.help_keyword 09-10T10:13:11 0 0 1224 1 0 0.022 mysql.help_relation 09-10T10:13:12 0 0 585 1 0 0.266 mysql.help_topic 09-10T10:13:12 0 0 0 1 0 0.031 mysql.ndb_binlog_index 09-10T10:13:12 0 0 0 1 0 0.024 mysql.plugin 09-10T10:13:12 0 0 6 1 0 0.287 mysql.proc 09-10T10:13:12 0 0 0 1 0 0.031 mysql.procs_priv 09-10T10:13:12 0 1 2 1 0 0.020 mysql.proxies_priv 09-10T10:13:12 0 0 0 1 0 0.024 mysql.servers 09-10T10:13:12 0 0 0 1 0 0.017 mysql.tables_priv 09-10T10:13:12 0 0 1820 1 0 0.019 mysql.time_zone 09-10T10:13:12 0 0 0 1 0 0.015 mysql.time_zone_leap_second 09-10T10:13:12 0 0 1820 1 0 0.267 mysql.time_zone_name 09-10T10:13:13 0 0 122530 1 0 0.326 mysql.time_zone_transition 09-10T10:13:13 0 0 8843 1 0 0.289 mysql.time_zone_transition_type 09-10T10:13:13 0 1 4 1 0 0.031 mysql.user 09-10T10:13:13 0 0 1 1 0 0.018 percona.DSN_Table 09-10T10:13:13 0 0 200 1 0 0.028 sakila.actor 09-10T10:13:13 0 0 603 1 0 0.023 sakila.address 09-10T10:13:13 0 0 16 1 0 0.033 sakila.category 09-10T10:13:13 0 0 600 1 0 0.023 sakila.city 09-10T10:13:13 0 0 109 1 0 0.029 sakila.country 09-10T10:13:14 0 0 599 1 0 0.279 sakila.customer 09-10T10:13:14 0 0 1000 1 0 0.287 sakila.film 09-10T10:13:14 0 0 5462 1 0 0.299 sakila.film_actor 09-10T10:13:14 0 0 1000 1 0 0.027 sakila.film_category 09-10T10:13:14 0 0 1000 1 0 0.032 sakila.film_text 09-10T10:13:14 0 0 4581 1 0 0.276 sakila.inventory 09-10T10:13:15 0 0 6 1 0 0.030 sakila.language 09-10T10:13:15 0 0 16049 1 0 0.303 sakila.payment 09-10T10:13:15 0 0 16044 1 0 0.310 sakila.rental 09-10T10:13:15 0 0 2 1 0 0.029 sakila.staff 09-10T10:13:15 0 0 2 1 0 0.020 sakila.store


The result shows a difference in the MySQL internal table for permissions. This is obviously not what we are interested in, as permissions are individual to a host. So we rather exclude the MySQL internal database and also the percona database, because it is not what we are interested in. Also in order to test it the tool works, we delete the last five category assignments from the table with <span class="lang:default decode:true crayon-inline">mysql -u root -h 172.17.0.3 -e &#8220;DELETE FROM sakila.film_category WHERE film_id > 995;&#8221;</span> and update a row in the city table with&nbsp;

mysql -u root -h 172.17.0.3 -e “update sakila.city SET city='Innsbruck’ WHERE city_id=590;“```

Now execute the command again:

pt-table-checksum --replicate=percona.checksums --create-replicate-table --empty-replicate-table \
   --recursion-method=dsn=t=percona.DSN_Table --ignore-databases mysql,percona -h 172.17.0.2 -P 3306 -u percona -pSECRET
            TS ERRORS  DIFFS     ROWS  CHUNKS SKIPPED    TIME TABLE
09-10T10:46:33      0      0      200       1       0   0.017 sakila.actor
09-10T10:46:34      0      0      603       1       0   0.282 sakila.address
09-10T10:46:34      0      0       16       1       0   0.034 sakila.category
09-10T10:46:34      0      1      600       1       0   0.269 sakila.city
09-10T10:46:34      0      0      109       1       0   0.028 sakila.country
09-10T10:46:34      0      0      599       1       0   0.285 sakila.customer
09-10T10:46:35      0      0     1000       1       0   0.297 sakila.film
09-10T10:46:35      0      0     5462       1       0   0.294 sakila.film_actor
09-10T10:46:35      0      1     1000       1       0   0.025 sakila.film_category
09-10T10:46:35      0      0     1000       1       0   0.031 sakila.film_text
09-10T10:46:35      0      0     4581       1       0   0.287 sakila.inventory
09-10T10:46:35      0      0        6       1       0   0.035 sakila.language
09-10T10:46:36      0      0    16049       1       0   0.312 sakila.payment
09-10T10:46:36      0      0    16044       1       0   0.320 sakila.rental
09-10T10:46:36      0      0        2       1       0   0.030 sakila.staff
09-10T10:46:36      0      0        2       1       0   0.027 sakila.store

You see that there is a difference in the tables sakila.city and in the table sakila.film_category. The tool does not report the actual number of differences, but rather the number of different chunks. To get the actual differences, we need to use a different tool, which utilises the checksum table that the previous step created.

Show the differences with pt-tabel-sync

The pt-table-sync tool is the counter part for the pt-table-checksum util. It can print or even replay the SQL statements that would render the slave the same state again to be in sync with the master. We can run a dry-run first, as the tool is potentially dangerous.

pt-table-sync --dry-run  --replicate=percona.checksums --sync-to-master h=172.17.0.3 -P 3306 \
   -u percona -pSECRET --ignore-databases mysql,percona
# NOTE: --dry-run does not show if data needs to be synced because it
#       does not access, compare or sync data.  --dry-run only shows
#       the work that would be done.
# Syncing via replication P=3306,h=172.17.0.3,p=...,u=percona in dry-run mode, without accessing or comparing data
# DELETE REPLACE INSERT UPDATE ALGORITHM START    END      EXIT DATABASE.TABLE
#      0       0      0      0 Chunk     08:57:51 08:57:51 0    sakila.city
#      0       0      0      0 Nibble    08:57:51 08:57:51 0    sakila.film_category

With –dry-run, you only see affected tables, but not the actual data because it does not really access the databases tables in question. Use –print additionally or instead of dry-run to get a list:

pt-table-sync --print --replicate=percona.checksums --sync-to-master h=172.17.0.3 -P 3306 \
  -u percona -pSECRET --ignore-databases mysql,percona
REPLACE INTO `sakila`.`city`(`city_id`, `city`, `country_id`, `last_update`) VALUES \
   ('590', 'Yuncheng', '23', '2006-02-15 04:45:25') 
  \ /*percona-toolkit src_db:sakila src_tbl:city  ...
REPLACE INTO `sakila`.`film_category`(`film_id`, `category_id`, `last_update`) VALUES ... 
REPLACE INTO `sakila`.`film_category`(`film_id`, `category_id`, `last_update`) VALUES ('997',... 
REPLACE INTO `sakila`.`film_category`(`film_id`, `category_id`, `last_update`) VALUES ('998', '11 ...
REPLACE INTO `sakila`.`film_category`(`film_id`, `category_id`, `last_update`) VALUES ('999', '3', ...
REPLACE INTO `sakila`.`film_category`(`film_id`, `category_id`, `last_update`) VALUES ('1000', '5', ... 

The command shows how we can rename back from Innsbruck to Yuncheng again and also provides the INSERT statements to get the deleted records back.When we replace –print with –execute, the data gets written to the master and replicated to the slave. To allow this, we need to set the permissions on the master

GRANT INSERT, UPDATE, DELETE ON sakila.* TO 'percona'@'172.17.0.1';
pt-table-sync --execute  --replicate=percona.checksums --check-child-tables \ 
  --sync-to-master h=172.17.0.3 -P 3306 -u percona -pSECRET --ignore-databases mysql,percona
REPLACE statements on sakila.city can adversely affect child table `sakila`.`address` 
   because it has an ON UPDATE CASCADE foreign key constraint. 
   See --[no]check-child-tables in the documentation for more information. 
   --check-child-tables error  while doing sakila.city on 172.17.0.3

This error indicates that updating the city table has consequences, because it is a FK to child tables. In this example, we are bold and ignore this warning. This is absolutely not recommended for real world scenarios.

pt-table-sync --execute  --replicate=percona.checksums --no-check-child-tables \
   --no-foreign-key-checks --sync-to-master h=172.17.0.3 -P 3306 -u percona -pSECRET \ 
   --ignore-databases mysql,percona

The command–no-check-child-tables ignores child tables and the command –no-foreign-key-checks ignores foreign keys.

Run the checksum command again to verify that the data has been restored:

pt-table-checksum --replicate=percona.checksums --create-replicate-table --empty-replicate-table \ 
   --recursion-method=dsn=t=percona.DSN_Table --ignore-databases mysql,percona 
   -h 172.17.0.2 -P 3306 -u percona -pSECRET

            TS ERRORS  DIFFS     ROWS  CHUNKS SKIPPED    TIME TABLE
09-10T11:24:42      0      0      200       1       0   0.268 sakila.actor
09-10T11:24:42      0      0      603       1       0   0.033 sakila.address
09-10T11:24:42      0      0       16       1       0   0.029 sakila.category
09-10T11:24:42      0      0      600       1       0   0.275 sakila.city
09-10T11:24:42      0      0      109       1       0   0.023 sakila.country
09-10T11:24:43      0      0      599       1       0   0.282 sakila.customer
09-10T11:24:43      0      0     1000       1       0   0.046 sakila.film
09-10T11:24:43      0      0     5462       1       0   0.284 sakila.film_actor
09-10T11:24:43      0      0     1000       1       0   0.036 sakila.film_category
09-10T11:24:43      0      0     1000       1       0   0.279 sakila.film_text
09-10T11:24:44      0      0     4581       1       0   0.292 sakila.inventory
09-10T11:24:44      0      0        6       1       0   0.031 sakila.language
09-10T11:24:44      0      0    16049       1       0   0.309 sakila.payment
09-10T11:24:44      0      0    16044       1       0   0.325 sakila.rental
09-10T11:24:44      0      0        2       1       0   0.029 sakila.staff
09-10T11:24:44      0      0        2       1       0   0.028 sakila.store

0 DIFFS, we are done!

Using Hibernate Search with Spring Boot

Spring Boot is a framework, that makes it much easier to develop Spring based applications, by following a convention over configuration principle (while in contrast Spring critics claim that the framework’s principle is rather configuration over everything). In this article, I am going to provide an example how to achieve the following:

  • Create a simple Web application based on Spring Boot
  • Persist and access data with Hibernate
  • Make it searchable with Hibernate Search (Lucine)

I use Eclipse with a Gradle plugin for convenience. MySQL will be our back-end for storing the data. The full example can be obtained from my [Github Repository][1].

Bootstrapping: Create a Simple Spring Boot Webapp

The easiest way to start with Spring Boot is heading over to [start.spring.io][2] and create a new project. In this example, I will use Gradle for building the application and handling the dependencies and I add Web and JPA starters.

[][3]

Download the archive to your local drive and extract it to a folder. I called the project SearchaRoo.

Import the Project with Eclipse

Import it as an existing Gradle Project in Eclipse by using the default settings. You will end up with a nice little project structure as shown below:

[][4]

We have a central application starter class denoted SearchaRooAppication.java, package definitions, application properties and even test classes. The great thing with Spring Boot is that it is very simple to start and that you can debug it as every other local Java application. There is no need for remote debugging or complex application server setups.

Prepare the Database

We need a few permissions on our MySQL instance before we can start.

CREATE DATABASE spring_employees;
CREATE USER 'dev'@'localhost' IDENTIFIED BY 'sEcReT';
GRANT SELECT, INSERT, UPDATE, DELETE, CREATE, DROP, RELOAD, FILE, REFERENCES, INDEX,
    ALTER, SHOW DATABASES, SUPER, LOCK TABLES, CREATE VIEW, SHOW VIEW 
    on spring_employees.* TO 'dev'@'localhost';
GRANT RELOAD on *.* TO 'dev'@'localhost';
FLUSH PRIVILEGES;```


We can then add the connection details into the application.properties file. We will edit this file several times when the complexity of this project increases.

===============================

= JPA / HIBERNATE

===============================

Specify the DBMS

spring.jpa.database = MYSQL

Show or not log for each sql query

spring.jpa.show-sql = true spring.datasource.url=jdbc:mysql://127.0.0.1/employees?createDatabaseIfNotExist=true spring.datasource.username=dev spring.datasource.password=sEcReT spring.datasource.driver-class-name=com.mysql.jdbc.Driver```

Now the basic database setup is done. We can then start adding model classes.

Getting some Employees on Board

MySQL offers a rather small but well documented sample database called employees, which is hosted on Github. Obtain and import the data as follows:

git clone https://github.com/datacharmer/test_db.git
cd test_db
mysql -u dev -p sEcReT < employees.sql

The script creates a new schema called employees and you will end up with a schema like this:

[][5]

In the course of this article, we are going to model this schema with Java POJOs by annotating the entities and the a appropriate fields with JPA.

Dependencies

Before we can start modelling the entities in Java, have a look at the Gradle build file. We include additional dependencies for the MySQL connector and Apache commons.

buildscript {
	ext {
		springBootVersion = '1.5.1.RELEASE'
	}
	repositories {
		mavenCentral()
	}
	dependencies {
		classpath("org.springframework.boot:spring-boot-gradle-plugin:${springBootVersion}")
	}
}

apply plugin: 'java'
apply plugin: 'eclipse'
apply plugin: 'org.springframework.boot'

jar {
	baseName = 'SearchaRoo'
	version = '0.0.1-SNAPSHOT'
}

sourceCompatibility = 1.8

repositories {
	mavenCentral()
}


dependencies {
	compile('org.springframework.boot:spring-boot-starter-data-jpa')
	compile('org.springframework.boot:spring-boot-starter-web')
	testCompile('org.springframework.boot:spring-boot-starter-test')
	compile("mysql:mysql-connector-java")
	compile('org.apache.commons:commons-lang3:3.5')
}

Modelling Reality

The next step covers modelling the data which we imported with Java POJOs. Obviously this is not the most natural way, because in general you would create the model first and then add data to it, but as we already had the data we decided to go in this direction. In the application.properties file, set the database to the imported employees database and set the Hibernate create property to validate. With this setting, we can confirm that we modelled the Java classed in accordance with the database model defined by the MySQL employees database.

An example of such a class is shown below, the other classes can be found in the Github repository.

package at.stefanproell.model;

import java.util.Date;
import java.util.List;

import javax.persistence.Column;
import javax.persistence.Entity;
import javax.persistence.EnumType;
import javax.persistence.Enumerated;
import javax.persistence.Id;
import javax.persistence.OneToMany;

@Entity(name="employees")
public class Employee {
&nbsp; &nbsp;@Id
&nbsp; &nbsp;@Column(name="emp_no")
&nbsp; &nbsp;private int employee_id;
&nbsp; &nbsp;
&nbsp; &nbsp;@Column(name="birth_date")
&nbsp; &nbsp;private Date birthdate;
&nbsp; &nbsp;
&nbsp; &nbsp;@Column(name="first_name")
&nbsp; &nbsp;private String firstname;
&nbsp; &nbsp;
&nbsp; &nbsp;@Column(name="last_name")
&nbsp; &nbsp;private String lastname;
&nbsp; &nbsp;
&nbsp; &nbsp;@Column(name="gender",columnDefinition = "ENUM('M', 'F', 'UNKNOWN') DEFAULT 'UNKNOWN'")
&nbsp; &nbsp;@Enumerated(EnumType.STRING)
&nbsp; &nbsp;private Gender gender;
&nbsp; &nbsp;
&nbsp; &nbsp;@Column(name="hire_date")
&nbsp; &nbsp;private Date hireDate;

&nbsp; &nbsp;@OneToMany(mappedBy="employee")
&nbsp; &nbsp;List<Title> titles; 
&nbsp; &nbsp;
&nbsp; &nbsp;@OneToMany(mappedBy="employee")
&nbsp; &nbsp;List<Department_Employee> employee_department;

&nbsp; &nbsp;// Setters and getters
&nbsp; &nbsp;
&nbsp; &nbsp;
}```


Now that we have prepared the data model, our schema is now fixed and does not change any more. We can deactivate the Hibernate based dynamic generation of the database tables and use the Spring database initialization instead.To see if we modelled the data correctly, we import MySQL employee data dump we obtained before and import it into our newly created schema, which maps the Java POJOs.

## Importing the Initial Data

In the next step, we import the data from the MySQL employee database into our schema spring_hibernate. This schema contains the tables that Hibernate created for us. The following script copies the data between the two schemata. If you see an error, then there is an issue with your model.

<pre class="theme:github lang:mysql decode:true">-- The original data is stored in the database called employees
-- Spring created the new schema called spring_employees
USE `spring_employees`;

-- Departments

INSERT INTO `spring_employees`.`departments`
(`dept_no`,
`dept_name`)
SELECT `departments`.`dept_no`,
    `departments`.`dept_name`
FROM `employees`.`departments`;

-- Employees

INSERT INTO `spring_employees`.`employees`
(`emp_no`,
`birth_date`,
`first_name`,
`gender`,
`hire_date`,
`last_name`)
SELECT `employees`.`emp_no`,
    `employees`.`birth_date`,
    `employees`.`first_name`,
    `employees`.`gender`,
    `employees`.`hire_date`,
    `employees`.`last_name`
FROM `employees`.`employees`;

-- Join table 
INSERT INTO `spring_employees`.`dept_emp`
(`emp_no`,
`dept_no`,
`from_date`,
`to_date`)
SELECT 
`dept_emp`.`emp_no`,
    `dept_emp`.`dept_no`,
    `dept_emp`.`from_date`,
    `dept_emp`.`to_date`
FROM `employees`.`dept_emp`;

-- Join table 

INSERT INTO `spring_employees`.`dept_manager`
(
`emp_no`,
`dept_no`,
`from_date`,
`to_date`)
SELECT `dept_manager`.`emp_no`,
    `dept_manager`.`dept_no`,
    `dept_manager`.`from_date`,
    `dept_manager`.`to_date`
FROM `employees`.`dept_manager`;

-- Titles

INSERT INTO `spring_employees`.`titles`
(`emp_no`,
`title`,
`from_date`,
`to_date`)
SELECT `titles`.`emp_no`,
    `titles`.`title`,
    `titles`.`from_date`,
    `titles`.`to_date`
FROM `employees`.`titles`;

-- Salaries

INSERT INTO `spring_employees`.`salaries`
(`emp_no`,
`salary`,
`from_date`,
`to_date`)
SELECT `salaries`.`emp_no`,
    `salaries`.`salary`,
    `salaries`.`from_date`,
    `salaries`.`to_date`
FROM `employees`.`salaries`;```


We now imported the data in the database schema that we defined for our project. Spring can load schema and initial data during start-up. So we provide two files, one containing the schema and the other one containing the data. To do that, we create two dumps of the database. One containing the schema only, the other one containing the data only.

mysqldump -u dev -psEcReT –no-data –databases spring_employees > src/main/resources/schema.sql mysqldump -u dev -psEcReT –no-create-info –databases employees > src/main/resources/data.sql```

By deactivating the Hibernate data generation and activating the Spring way, the database gets initialized every time the application starts. Change and edit the following lines in the application.properties

spring.jpa.hibernate.ddl-auto=none
spring.datasource.initialize=true
spring.datasource.schema=classpath:/schema.sql
spring.datasource.data=classpath:/data.sql```


Before we can import the data with the scripts, make sure to drop the schema and disable foreign key checks in the schema file and enable them again at the end. Spring ignores the actionable MySQL comments. So your schema file should contain this

<pre class="theme:github lang:default decode:true ">DROP DATABASE IF EXISTS `spring_employees`;
SET foreign_key_checks = 0;

// rest of the code

SET foreign_key_checks = 1;```


And also insert the two foreign key statements to the data file. Note that the import can take a while. If you are happy with the initialized data, you can deactivate the initialization by setting the variable to false: <span class="lang:default decode:true crayon-inline">spring.datasource.initialize=false</span>

The application.properties file meanwhile looks like this:

<pre class="theme:github lang:default decode:true "># ===============================
# = JPA / HIBERNATE
# ===============================

# Specify the DBMS
spring.jpa.database = MYSQL

# Show or not log for each sql query
spring.jpa.show-sql = true
spring.datasource.url=jdbc:mysql://127.0.0.1/spring_employees?createDatabaseIfNotExist=true
spring.datasource.username=dev
spring.datasource.password=sEcReT
spring.datasource.driver-class-name=com.mysql.jdbc.Driver
spring.datasource.connectionProperties=useUnicode=true;characterEncoding=utf-8;
spring.jpa.properties.hibernate.dialect = org.hibernate.dialect.MySQL5Dialect
# Do not initialize anything
spring.jpa.hibernate.ddl-auto=none
spring.datasource.initialize=false
spring.datasource.schema=classpath:/schema.sql
spring.datasource.data=classpath:/data.sql
spring.datasource.platform=mysql```


# Adding Hibernate Search

Hibernate search offers full-text search capabilities by using a dedicated index. We need to add the dependencies to the build file.

<pre class="theme:github lang:default decode:true ">dependencies {
	compile('org.springframework.boot:spring-boot-starter-data-jpa')
	compile('org.springframework.boot:spring-boot-starter-web')
	testCompile('org.springframework.boot:spring-boot-starter-test')
	compile("mysql:mysql-connector-java")
	compile('org.apache.commons:commons-lang3:3.5')
	compile("org.hibernate:hibernate-search-orm:5.5.6.Final")
	compile('org.springframework.boot:spring-boot-starter-test')
	compile('org.springframework.boot:spring-boot-starter-logging')
	compile('org.springframework.boot:spring-boot-starter-freemarker')
}```


Refresh the gradle file after including the search dependencies.

## Adding Hibernate Search Dependencies

In this step, we annotate the model POJO classes and introduce the full-text search index. Hibernate search utilises just a few basic settings to get started. Add the following variables to tne application properties file.

===============================

= HIBERNATE SEARCH

===============================

Spring Data JPA will take any properties under spring.jpa.properties.* and

pass them along (with the prefix stripped) once the EntityManagerFactory is

created.

Specify the DirectoryProvider to use (the Lucene Directory)

spring.jpa.properties.hibernate.search.default.directory_provider = filesystem

Using the filesystem DirectoryProvider you also have to specify the default

base directory for all indexes (make sure that the application have write

permissions on such directory)

spring.jpa.properties.hibernate.search.default.indexBase = /tmp/SearchRroo/```

Please not that storing the Lucene index in the tmp directory is not the best idea, but for testing we can use this rather futile location. We also use the filesystem to store the index, as this is the simplest approach.

Create a Service

In order to facilitate Hibernate Search on our data, we add a service class, which offers methods for searching. The service uses a configuration, which is injected by Spring during run time. The configuration is very simple.

package at.stefanproell.service;

import javax.persistence.EntityManager;

import org.slf4j.Logger;
import org.slf4j.LoggerFactory;
import org.springframework.beans.factory.annotation.Autowired;
import org.springframework.context.annotation.Bean;
import org.springframework.context.annotation.Configuration;


@Configuration
public class HibernateSearchConfiguration {
	private final Logger logger = LoggerFactory.getLogger(HibernateSearchConfiguration.class);

	@Autowired
	private EntityManager entityManager;

	@Bean
	HibernateSearchService hibernateSearchService() {
		HibernateSearchService hibernateSearchService = new HibernateSearchService(entityManager);
		hibernateSearchService.initializeHibernateSearch();
		return hibernateSearchService;
	}
}```


The @Configuration is loaded when Spring builds the application context. It provides a bean of our service, which can then be injected into the application. The service itself provides methods for creating and searching the index. In this example, the search method is very simple: it only searches on the first and the last name of an employee and it allows users to make one mistake (distance 1).

<pre class="theme:github lang:default decode:true">package at.stefanproell.service;

import java.util.List;

import javax.persistence.EntityManager;
import javax.persistence.NoResultException;
import javax.persistence.PersistenceContext;

import org.apache.lucene.search.Query;
import org.hibernate.search.jpa.FullTextEntityManager;
import org.hibernate.search.jpa.Search;
import org.hibernate.search.query.dsl.QueryBuilder;
import org.slf4j.LoggerFactory;
import org.springframework.beans.factory.annotation.Autowired;
import org.springframework.stereotype.Service;
import org.springframework.transaction.annotation.Transactional;


import at.stefanproell.model.Employee;
import ch.qos.logback.classic.Logger;

@Service
public class HibernateSearchService {

&nbsp; &nbsp;private final Logger logger = (Logger) LoggerFactory.getLogger(HibernateSearchService.class);

&nbsp; &nbsp;private final EntityManager entityManager;

&nbsp; &nbsp;@Autowired
&nbsp; &nbsp;public HibernateSearchService(EntityManager entityManager) {
&nbsp; &nbsp;&nbsp;&nbsp; &nbsp;super();
&nbsp; &nbsp;&nbsp;&nbsp; &nbsp;this.entityManager = entityManager;
&nbsp; &nbsp;}


&nbsp; &nbsp;public void initializeHibernateSearch() {

&nbsp; &nbsp;&nbsp;&nbsp; &nbsp;try {
&nbsp; &nbsp;&nbsp;&nbsp; &nbsp;&nbsp;&nbsp; &nbsp;FullTextEntityManager fullTextEntityManager = Search.getFullTextEntityManager(entityManager);
&nbsp; &nbsp;&nbsp;&nbsp; &nbsp;&nbsp;&nbsp; &nbsp;fullTextEntityManager.createIndexer().startAndWait();
&nbsp; &nbsp;&nbsp;&nbsp; &nbsp;} catch (InterruptedException e) {
&nbsp; &nbsp;&nbsp;&nbsp; &nbsp;&nbsp;&nbsp; &nbsp;// TODO Auto-generated catch block
&nbsp; &nbsp;&nbsp;&nbsp; &nbsp;&nbsp;&nbsp; &nbsp;e.printStackTrace();
&nbsp; &nbsp;&nbsp;&nbsp; &nbsp;}
&nbsp; &nbsp;}
&nbsp; &nbsp;
&nbsp; &nbsp;@Transactional
&nbsp; &nbsp;public List<Employee> fuzzySearch(String searchTerm){

&nbsp; &nbsp;&nbsp;&nbsp; &nbsp;FullTextEntityManager fullTextEntityManager = Search.getFullTextEntityManager(entityManager);
&nbsp; &nbsp;&nbsp;&nbsp; &nbsp;QueryBuilder qb = fullTextEntityManager.getSearchFactory().buildQueryBuilder().forEntity(Employee.class).get();
&nbsp; &nbsp;&nbsp;&nbsp; &nbsp;Query luceneQuery = qb.keyword().fuzzy().withEditDistanceUpTo(1).withPrefixLength(1).onFields("firstname", "lastname")
&nbsp; &nbsp;&nbsp;&nbsp; &nbsp;&nbsp;&nbsp; &nbsp;&nbsp;&nbsp; &nbsp;.matching(searchTerm).createQuery();

&nbsp; &nbsp;&nbsp;&nbsp; &nbsp;javax.persistence.Query jpaQuery = fullTextEntityManager.createFullTextQuery(luceneQuery, Employee.class);

&nbsp; &nbsp;&nbsp;&nbsp; &nbsp;// execute search

&nbsp; &nbsp;&nbsp;&nbsp; &nbsp;List<Employee> employeeList = null;
&nbsp; &nbsp;&nbsp;&nbsp; &nbsp;try {
&nbsp; &nbsp;&nbsp;&nbsp; &nbsp;&nbsp;&nbsp; &nbsp;employeeList&nbsp; = jpaQuery.getResultList();
&nbsp; &nbsp;&nbsp;&nbsp; &nbsp;} catch (NoResultException nre) {
&nbsp; &nbsp;&nbsp;&nbsp; &nbsp;&nbsp;&nbsp; &nbsp;logger.warn("No result found");

&nbsp; &nbsp;&nbsp;&nbsp; &nbsp;}

&nbsp; &nbsp;&nbsp;&nbsp; &nbsp;return employeeList;

&nbsp; &nbsp;
&nbsp; &nbsp;}
}

The service implementation currently only contains an initialization method, which used for creating the Lucene index on the filesystem. Before we can test the index, we need to have at least one indexed entity. This can be achieved by simply adding the annotation @Indexed to the POJO.

Deploying MySQL in a Local Development Environment

Installing MySQL via apt-get is a simple task, but the migration between different MySQL versions requires planning and testing. Thus installing one central instance of the database system might not be suitable, when the version of MySQL or project specific settings should be switched quickly without interfering with other applications. Using one central instance can quickly become cumbersome. In this article, I will describe how any number of MySQL instances can be stored and executed from within a user’s home directory.

Adapting MySQL Data an Log File Locations

Some scenarios might require to run several MySQL instances at once, other scenarios cover sensitive data, where we do not want MySQL to write any data on non-encrypted partitions. This is especially true for devices which can get easily stolen, for instance laptops. If you use a laptop for developing your applications from time to time, chances are good that you need to store sensitive data in a database, but need to make sure that the data is encrypted when at rest. The data stored in a database needs to be protected when at rest.

This can be solved with full disk encryption, but this technique has several disadvantages. First of all, full disk encryption only utilises one password. This entails, that several users who utilise a device need to share one password, which reduces the reliability of this approach. Also when the system needs to be rebooted, full disk encryption can become an obstacle, which increases the complexity further.

Way easier to use is the transparent home directory encryption, which can be selected during many modern Linux setup procedures out of the box. We will use this encryption type for this article, as it is reasonable secure and easy to setup. Our goal is to store all MySQL related data in the home directory and run MySQL with normal user privileges.

Creating the Directory Structure

The first step is creating a directory structure for storing the data. In this example, the user name is stefan, please adapt to your needs.

A MySQL 5.7 Cluster Based on Ubuntu 16.04 LTS – Part 2

In a recent article, I described how to setup a basic MySQL Cluster with two data nodes and a combined SQL and management node. In this article, I am going to highlight a hew more things and we are going to adapt the cluster a little bit.

Using Hostnames

For making our lives easier, we can use hostnames which are easier to remember than IP addresses. Hostnames can be specified for each VM in the file /etc/hosts. For each request to the hostname, the operating system will lookup the corresponding IP address. We need to change this file on all three nodes to the following example: